Approaching Access Control on the Web
Learn how to build future-proof, state of the art login, access control and API security systems in this multipart series.

Founder & CTO
This is the first blog post in a multi-part series about access control on the web. The goal of this series is to become the go-to guide for anyone that needs help with setting up access control (authentication & authorization) for their web application. The following topics will be covered:
- An overview of different access control approaches on the web (this blog post).
- A guide to help you choose the right approach for your project including implementation best practices.
- An in-depth look at token-centric access control, touching popular topics such as OAuth 2.0, OpenID Connect, JSON Web Tokens.
- A comparison of popular permission systems such as Access Control List (ACL), Role Based Access Control (RBAC), and advanced policy definition languages.
- Open source software you can use to save yourself a lot of time and money.
If you’re expecting this to be a corporate sales pitch, fear not! I am writing this series because it took me forever to collect this knowledge from scattered resources across the web (Stack Overflow, Security Exchange, Google Groups, …), tutorials, or books. I was especially frustrated by the amount of SEO-optimized content that has the primary goal of on-boarding you to an expensive Identity SaaS. I sincerely hope this series is capable of transmitting my knowledge to you. If it isn't, ask me questions or bash me on Twitter.
If you wish to be notified when new parts of this series are released subscribe to our security newsletter .
Introduction
Almost every internet-facing application has the concept of users and permissions, usually summarized as access control. Access control has many facets because it typically represents the access control structure of a real-world entity (e.g. company). While there is no silver bullet, not everything has to be reinvented. Yet, developers spend days, weeks, even months on learning about or coming up with authentication and authorization schemes. In fact, you should not develop your own systems but use proven & tested (open source) technology like the one we build.
Terminology
You probably have some idea of what access control is already. Our experience has shown that it’s still helpful to refresh a few terminologies as to avoid confusion.
- Authentication: The process of ascertaining that somebody really is who they claim to be.
- Authorization: The process of verifying access rights and granting or denying access in the context of access requests.
- Access Control: The selective restriction of access to a place or other resource.
- Auth* (AuthZ + AuthN): Shorthand for Authorization (AuthZ) and Authentication (AuthN).
- Resource Server: This is a server that provides resources/data to the user. This blog post, for example, is rendered by a resource server.
When performing access control, web applications typically authenticate the user, authorize the access request, and finally allow or prevent access to the requested resource. But authorization does not require authentication, and neither does authentication require authorization: An anonymous user is not authenticated, but may still be allowed (authorized) to read a public blog post. Both concepts are independent but central to security design.
Types of Access Control on the Web (simplified)
There are numerous ways of restricting access to resources on the web. To give you a bit of context, we will look at the most common ones. This list is not exclusive but it gives you an overview of what concepts exist today and why they evolved.
Server-Side “Monolithic” Applications
Controlling access to resources in a “monolithic” web application rendered server-side (Wordpress, Laravel PHP, Symfony, Java Spring MVC, Ruby on Rails, …) is well-established. Most languages/frameworks come with plug-and-play libraries that identify users based on a cookie. If the cookie is not set, the user is not authenticated.

Restricting access to the application’s resources usually consists of four phases:
- The user tries to access a protected resource but no cookie is set. The application redirects the browser to the login endpoint.
- The user authenticates by entering his/her credentials (e.g. username +
password) in the login form hosted by the application. If the credentials
prove to be correct (this is authentication), the application sends an HTTP
response containing the
Set-Cookieheader. That header contains a cookie which is sent by the browser in subsequent requests to the web application. The cookie contains data which is used to identify the user. - The user accesses the protected resource again. This time, the browser sends the session cookie set by the login endpoint.
- The application validates (authenticates) the session cookie. It may optionally check if the user has permission to access the protected resource (authorization).
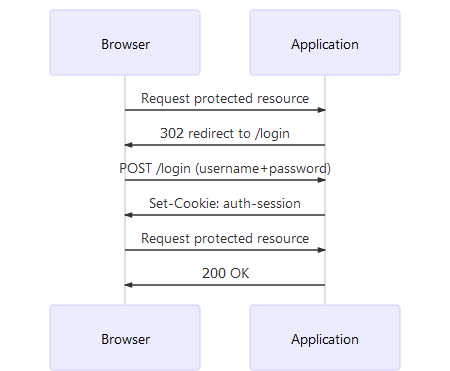
Let’s take a short look at some pseudo code (NodeJS for simplicity) that implements this behavior at the resource endpoint (not the login endpoint):
app.get(
  "/some-protected-resource",
  auth.hasValidSession,
  auth.hasPermission("canEditContent"),
  function (req, res) {
    // console.log(req.user.email)
  },
)
In this case, we are assuming that auth is some type of middleware that allows
us to check if the client (browser) is authenticated (using the session cookie)
and whether or not the authenticated client is allowed to canEditContent. With
the express-session middleware you would probably check if a session is set and
if it contains a user:
const auth = {
  hasValidSession: (req, res, next) => {
    if (!req.session.user) {
      res.redirect("/login")
    } else {
      next()
    }
  },
}
while the latter auth.hasPermission('canEditContent') uses, for example, an
Access Control List to
decide if req.user.email is allowed to canEditContent.
Client-Side Applications
Client-side applications are typically javascript applications (React, Angular) running in the browser - sometimes referred to as single page apps (SPA) - or mobile apps built with Ionic, React Native, Objective C/Swift (iOS) or Java (Android).
What differentiates these applications from server-side applications is that the data is not rendered server-side but instead provided in a machine-readable form through an API (e.g. REST, GraphQL). The API itself is protected either through the already established cookie mechanism or a substitute (tokens).
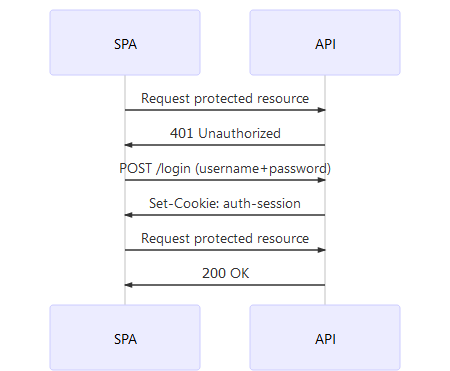
Cookie-based authorization is legitimate for SPAs and even encouraged for apps that run in the browser. Most browsers support cookie flags httpOnly and secure which tell the browser that the cookie should
- not be readable by the javascript application itself which mitigates XSS attacks on your precious cookie credentials by reading from localStorage.
- should only be transmitted when the request is sent via HTTPS, mitigating man-in-the-middle attacks.
Most native mobile apps (without WebView) however use token-based authorization. Reasons vary but it usually revolves around complexity. Developers typically opt for:
- Show a login form to the user.
- Send the credentials to an API.
- The API returns a token on success.
- The app stores that token locally and uses it on consecutive requests.
Implementing this flow with cookies looks similar, but additionally involves parsing of different cookie flags ( secure, Max-Age, domain...) which is added complexity most developers like to avoid. Some third-party libraries do not event support cookies and force you to use tokens or API keys.
To include a token in an HTTP request, it’s usually added to the HTTP Authorization Header:
GET /protected-resource HTTP/1.1
Host: foobar.com
Authorization: bearer <some-token>
There are two distinct token formats: pass-by-reference and pass-by-value. For now we will just stick with a random ID (e.g. abcde) and talk about the different token types later in this series.
Let’s revisit the same flow but this time with a smartphone as a client (not a browser) and a token instead of a cookie:
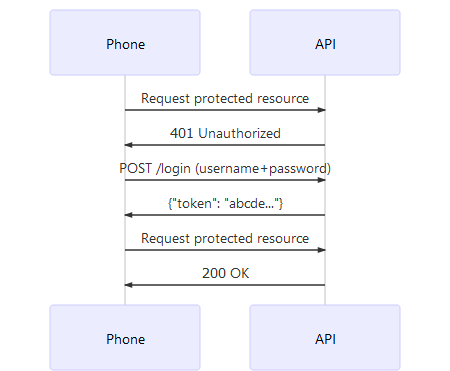
Looks pretty much the same, right? Well, it is. Instead of sending the cookie in
the HTTP header ( Cookie: ... ), we are now sending the token in the HTTP
header ( Authorization: bearer abcde ).
There is no real winner in the cookie versus token debate. Cookies can be a very good choice for browser-based applications because browsers deal with the complexity of storage and security. But cookies also require CORS to be properly configured, make CSRF attacks easier, and do not work cross-domain.
In conclusion, both approaches, token and cookies, have their advantages and disadvantages. Native mobile apps usually avoid cookies while browser apps lean towards cookies. And that’s also my recommendations if you have to make this decision right now.
Server-Side Distributed Applications
As your team or company grows, you eventually add more services and applications to your infrastructure. Sometimes people talk about microservices or service-oriented architecture when referring to this.
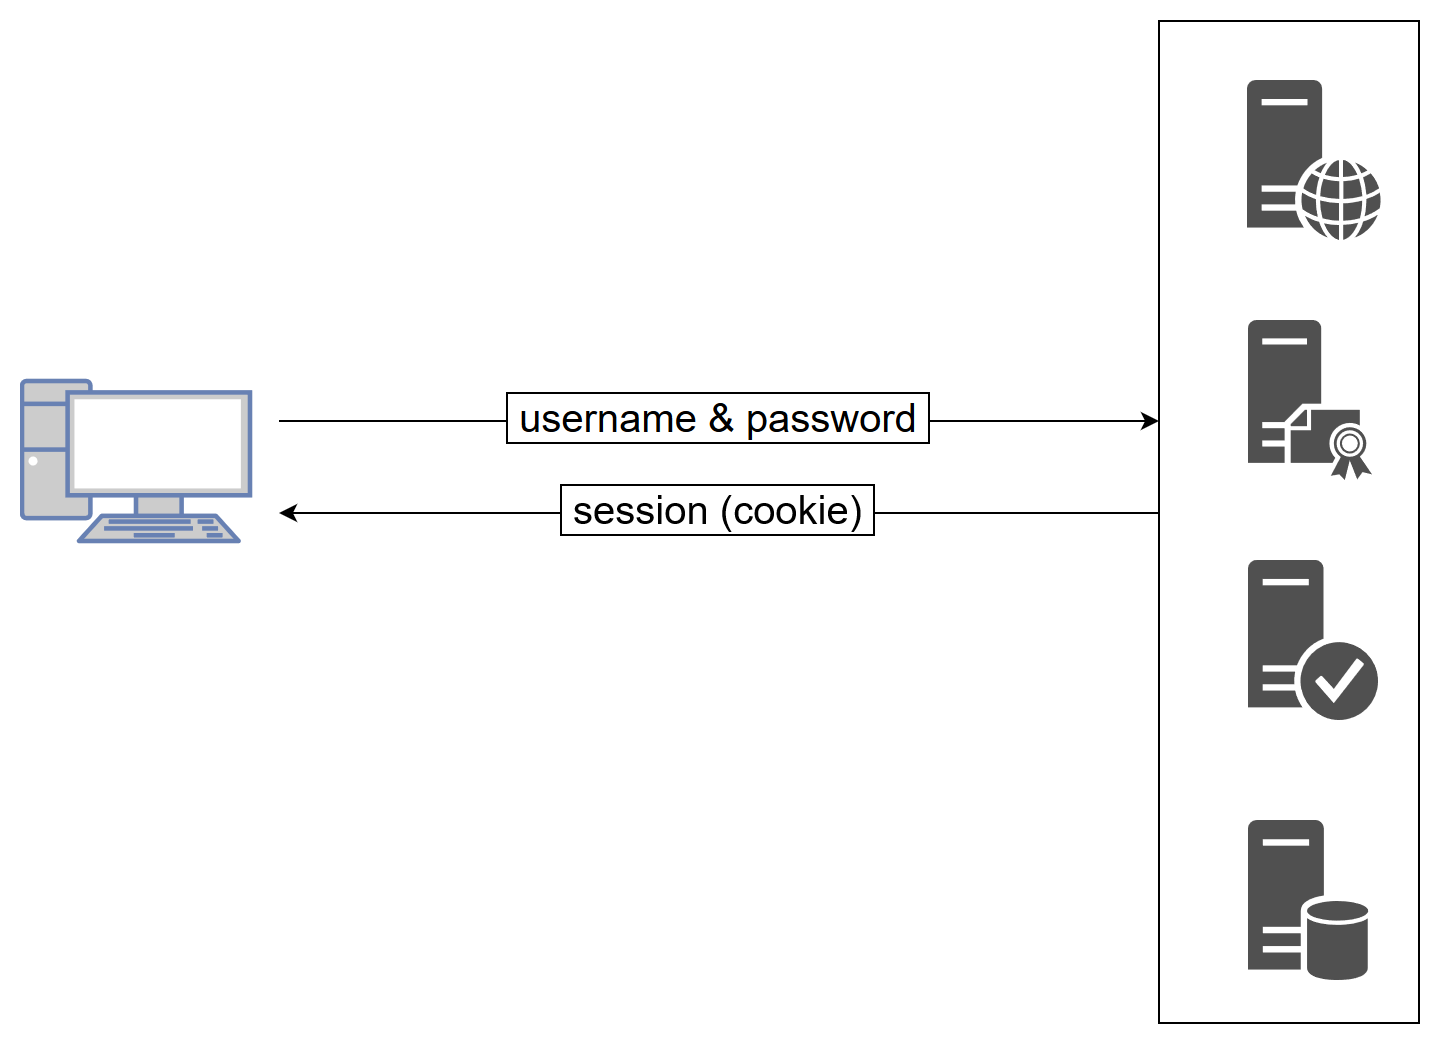
Let’s take a look at how access control works in such an environment. If we assume the infrastructure from before, each service would have its own authentication and authorization system. The client (browser) would authenticate at each service individually and receive a cookie (or token). This is bad for several reasons:
- Most users do not use passwords managers and instead reuse their credentials at each service. This would allow a developer of service A to eavesdrop on the credentials in the login screen and use those to log into services B and C, impersonating the user. This is extremely dangerous in very sensitive systems.
- The user administration is cumbersome as a user has to be managed on each service individually.
- Your users will eventually complain that they have multiple user accounts for what they perceive as one system.
The obvious solution to this is to introduce another service which is responsible for managing users and exchanging usernames and passwords for temporary credentials. This is usually called Single Sign-On (SSO).
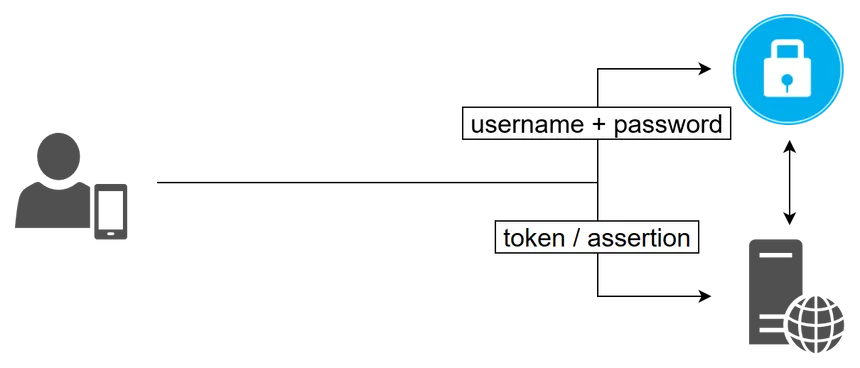
The SSO service is responsible for user management (signup, banning, removing, updating profile pictures, …) and is also capable of logging people in. Onl the SSO has access to the highly privileged and long-living user credentials (username + password). Instead of submitting the password to each service - and thus potentially enabling malicious developers or hackers to eavesdrop - only one fortified service (SSO) has access to them.
Once the user is authenticated, the SSO service can either issue a token (sometimes also called assertion) or set a cookie for the whole domain. The SSO service may scope (“limit”) the access rights of the token/cookie - for example, it might only be valid for the blog service.
While setting a domain-wide cookie is a valid practice for an SSO service, most issue tokens which are sent on every request by the client:
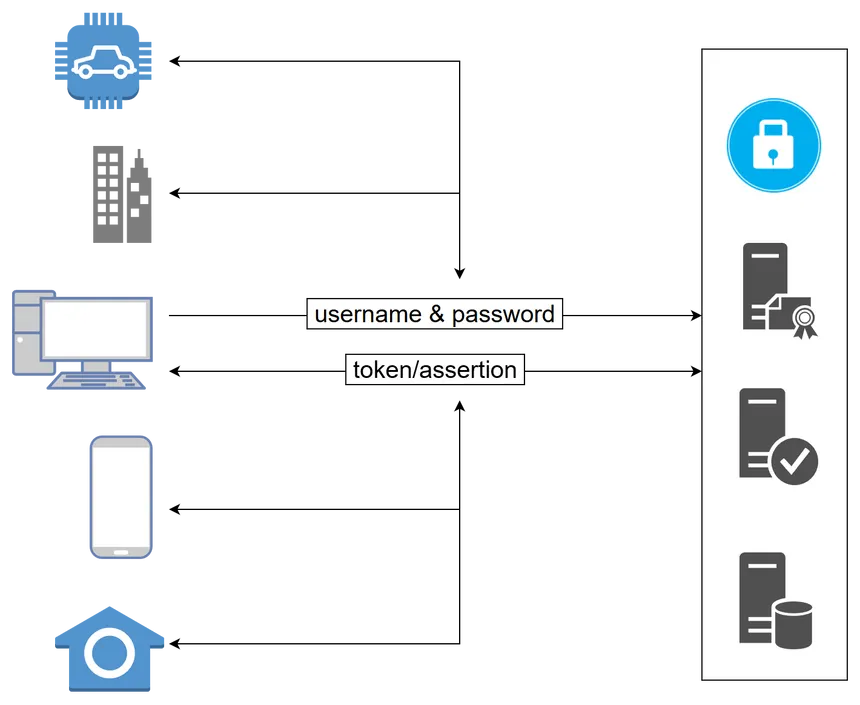
Most SSO products (open source & SaaS) implement open auth* protocols like SAML, OAuth 2.0, or OpenID Connect to ship this feature in an interoperable way.
Ory Hydra is an open source product which implements the OAuth 2.0 and OpenID Connect protocols. You should check it out if you are looking for cloud-native, scalable and battle-tested authorization server.
Browsers, Smart Homes, Smartphones, ...
Today, most applications serve a variety of clients, from smart homes to browser apps, to native apps, to 3rd party developers. Here is where cookies are no longer viable for API access control. Instead, these systems rely on well-established and peer-reviewed protocols such as OAuth 2.0. These protocols use token-based authorization only.
Especially when sharing access to APIs with 3rd party developers, you need to make sure that users actually want their data exposed to these 3rd parties. This is what specifically OAuth 2.0 was made for:
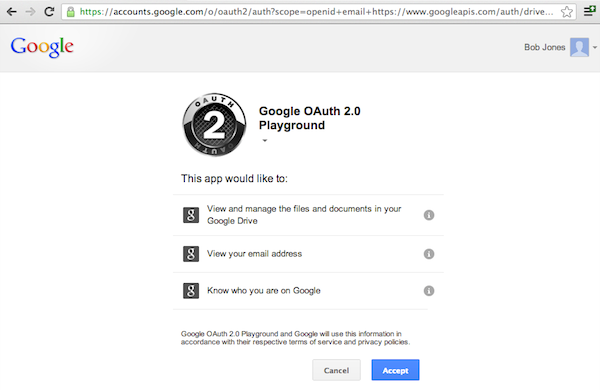
We will leave it at that for now. OAuth 2.0 and OpenID Connect have steep learning curves, so we will be looking at those in detail in a later part of this series!
Conclusion
Now you have a high-level overview of the different auth* environments that exist today. This knowledge will help you significantly in understanding the blog posts coming up in the next weeks. Please note that we did not touch topics like Kerberos or SAML. These systems are totally legitimate but tend to be found in enterprise and/or legacy systems only. If you want a blog post about this, let me know on twitter!
Also, I’d like to invite you to check out our open source products on GitHub . If you are interested in this topic, you will probably find a product that you can use!
If you wish to be notified when new parts of this series are released subscribe to our security newsletter now!
Consulting
You have an urgent project coming up and need some advice with designing a secure system? We’re here to help - contact us here.
Further reading

Bad Robot: What Makes Agentic AI Good vs. Bad?

Understand the risks of insecure MCP implementations and how OAuth keeps your AI agents compliant, trustworthy, and safe.

Tips for Successful CIAM Strategies

Learn how to utilize CIAM to its fullest with a strategy guide that will assist in safeguarding data, ensuring compliance and more.