Run your enterprise ready SSO Server in minutes
Your path to effortless SSO: Unlock the benefits of our open-source OAuth2 server tutorial. Consolidate authentication and protect user data with confidence!

Developer Advocate
In this tutorial, we'll guide you through setting up an OAuth2 / OIDC server to offer Single Sign-On (SSO) login, like Login with Google, but using your own service, such as Login with Your Corp.
This guide is for you if
- you want to use your own OAuth2/OIDC server instead of a third-party service like Google or Facebook
- you want to centralize authentication for employees or customers across several brands, allowing them to create a single account on your OAuth2 server and use it for seamless SSO login on other domains
- you want to enable third parties to offer SSO login using your OAuth2 server - for example, if you're a bank and want to allow your customers to use their bank account to log in to other services
You have several options to set up your enterprise SSO server using Ory. This tutorial shows the option that uses several Ory Network projects. This is a good choice if you want to manage several domains or applications with separate identity pools, user interfaces, and settings. You can also implement SSO using a single project, with a shared identity pool, user interface, and settings. A tutorial for this option is coming soon.
This tutorial will illustrate how to set up and configure two Ory Network projects:
- the OAuth2 server for Your Corp, powered by Ory OAuth2 and Ory Identities
- the Ory Network project for one of your Your Corp domains, let's say domain1.com, powered by Ory Identities
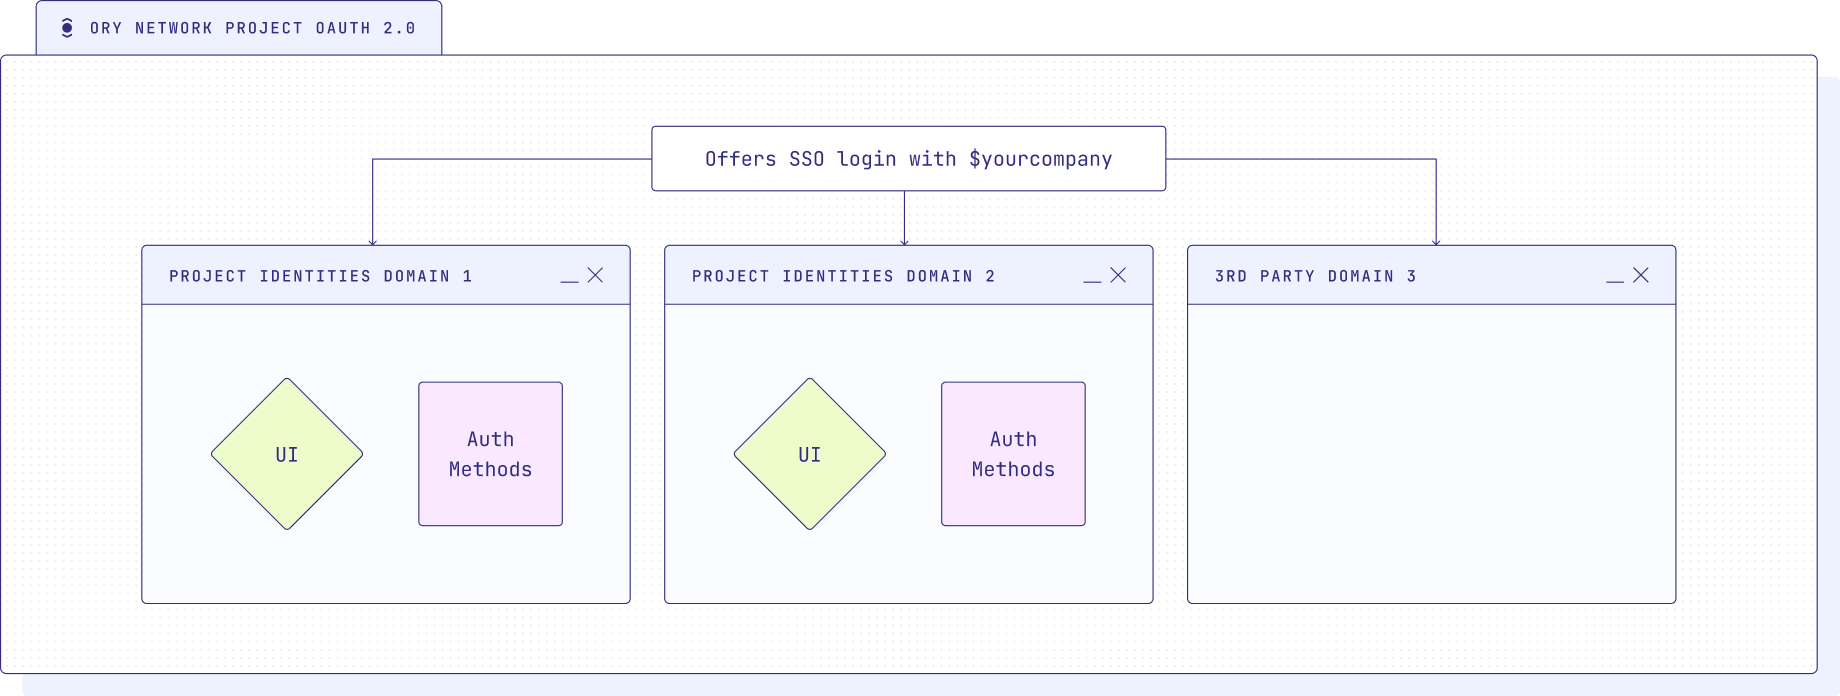
The following diagram shows the setup, where the OAuth2 server is the central SSO server, that offers SSO login with $yourcompany to your other domains - each with its own UI and authentication settings -, as well as any third-party domains that want to offer SSO login using your OAuth2 server. We will only set up one domain in this tutorial, but you can add as many as you like following the same steps.

Ory Network is built on top of Ory Open Source software, aiming to provide a planet-scale, low-latency, resilient, and secure service that's zero set up, and it allows you to sign up users, implement custom user interfaces for apps, model and check permissions, and manage more complex auth flows. Create a free Developer account
- in the Ory Console
- using
ory authwith the Ory CLI
and follow along with this tutorial.
Create Ory Network OAuth2 server project
To get started, you'll need to create an Ory Network project that will serve as the central OAuth2/OIDC server. You can do that in the Ory Console or using the Ory CLI. If you don't have the CLI installed yet, head over to the installation instructions.
ory create project --name "OAuth2 Server - Your Corp"
You'll see a response like this:
Project created successfully!
ID <your-project-id>
SLUG <your-project-slug>
STATE running
NAME OAuth2 Server - Your Corp
# The project ID and slug are used to
# configure your Ory Network project through the CLI.
This project will handle user authentication and issue access tokens for SSO login. In this project, you'll create a new OAuth2 client with specific details next.
Create a new OAuth2 client
In the central OAuth2 project, you'll create a new OAuth2 client that will be used for SSO authentication. You can do this using the Console UI or the Ory CLI.
Open OAuth2 in the Ory
Console, then click on the Add New Client button and choose Server App.
The basics are already filled in for you, add a name for your client and the
email scope in the Scope field.
Now open a new tab to get the Redirect URI. This is the URL where users will be redirected after they have authenticated with the OAuth2 server. We'll use the URI from our domain1.com project. To get the URI,
- Open the Ory Network Projects page
- Select the Identities - domain1.com project we created before
- Open the Authentication/Social Sign-In & SSO (OIDC) page
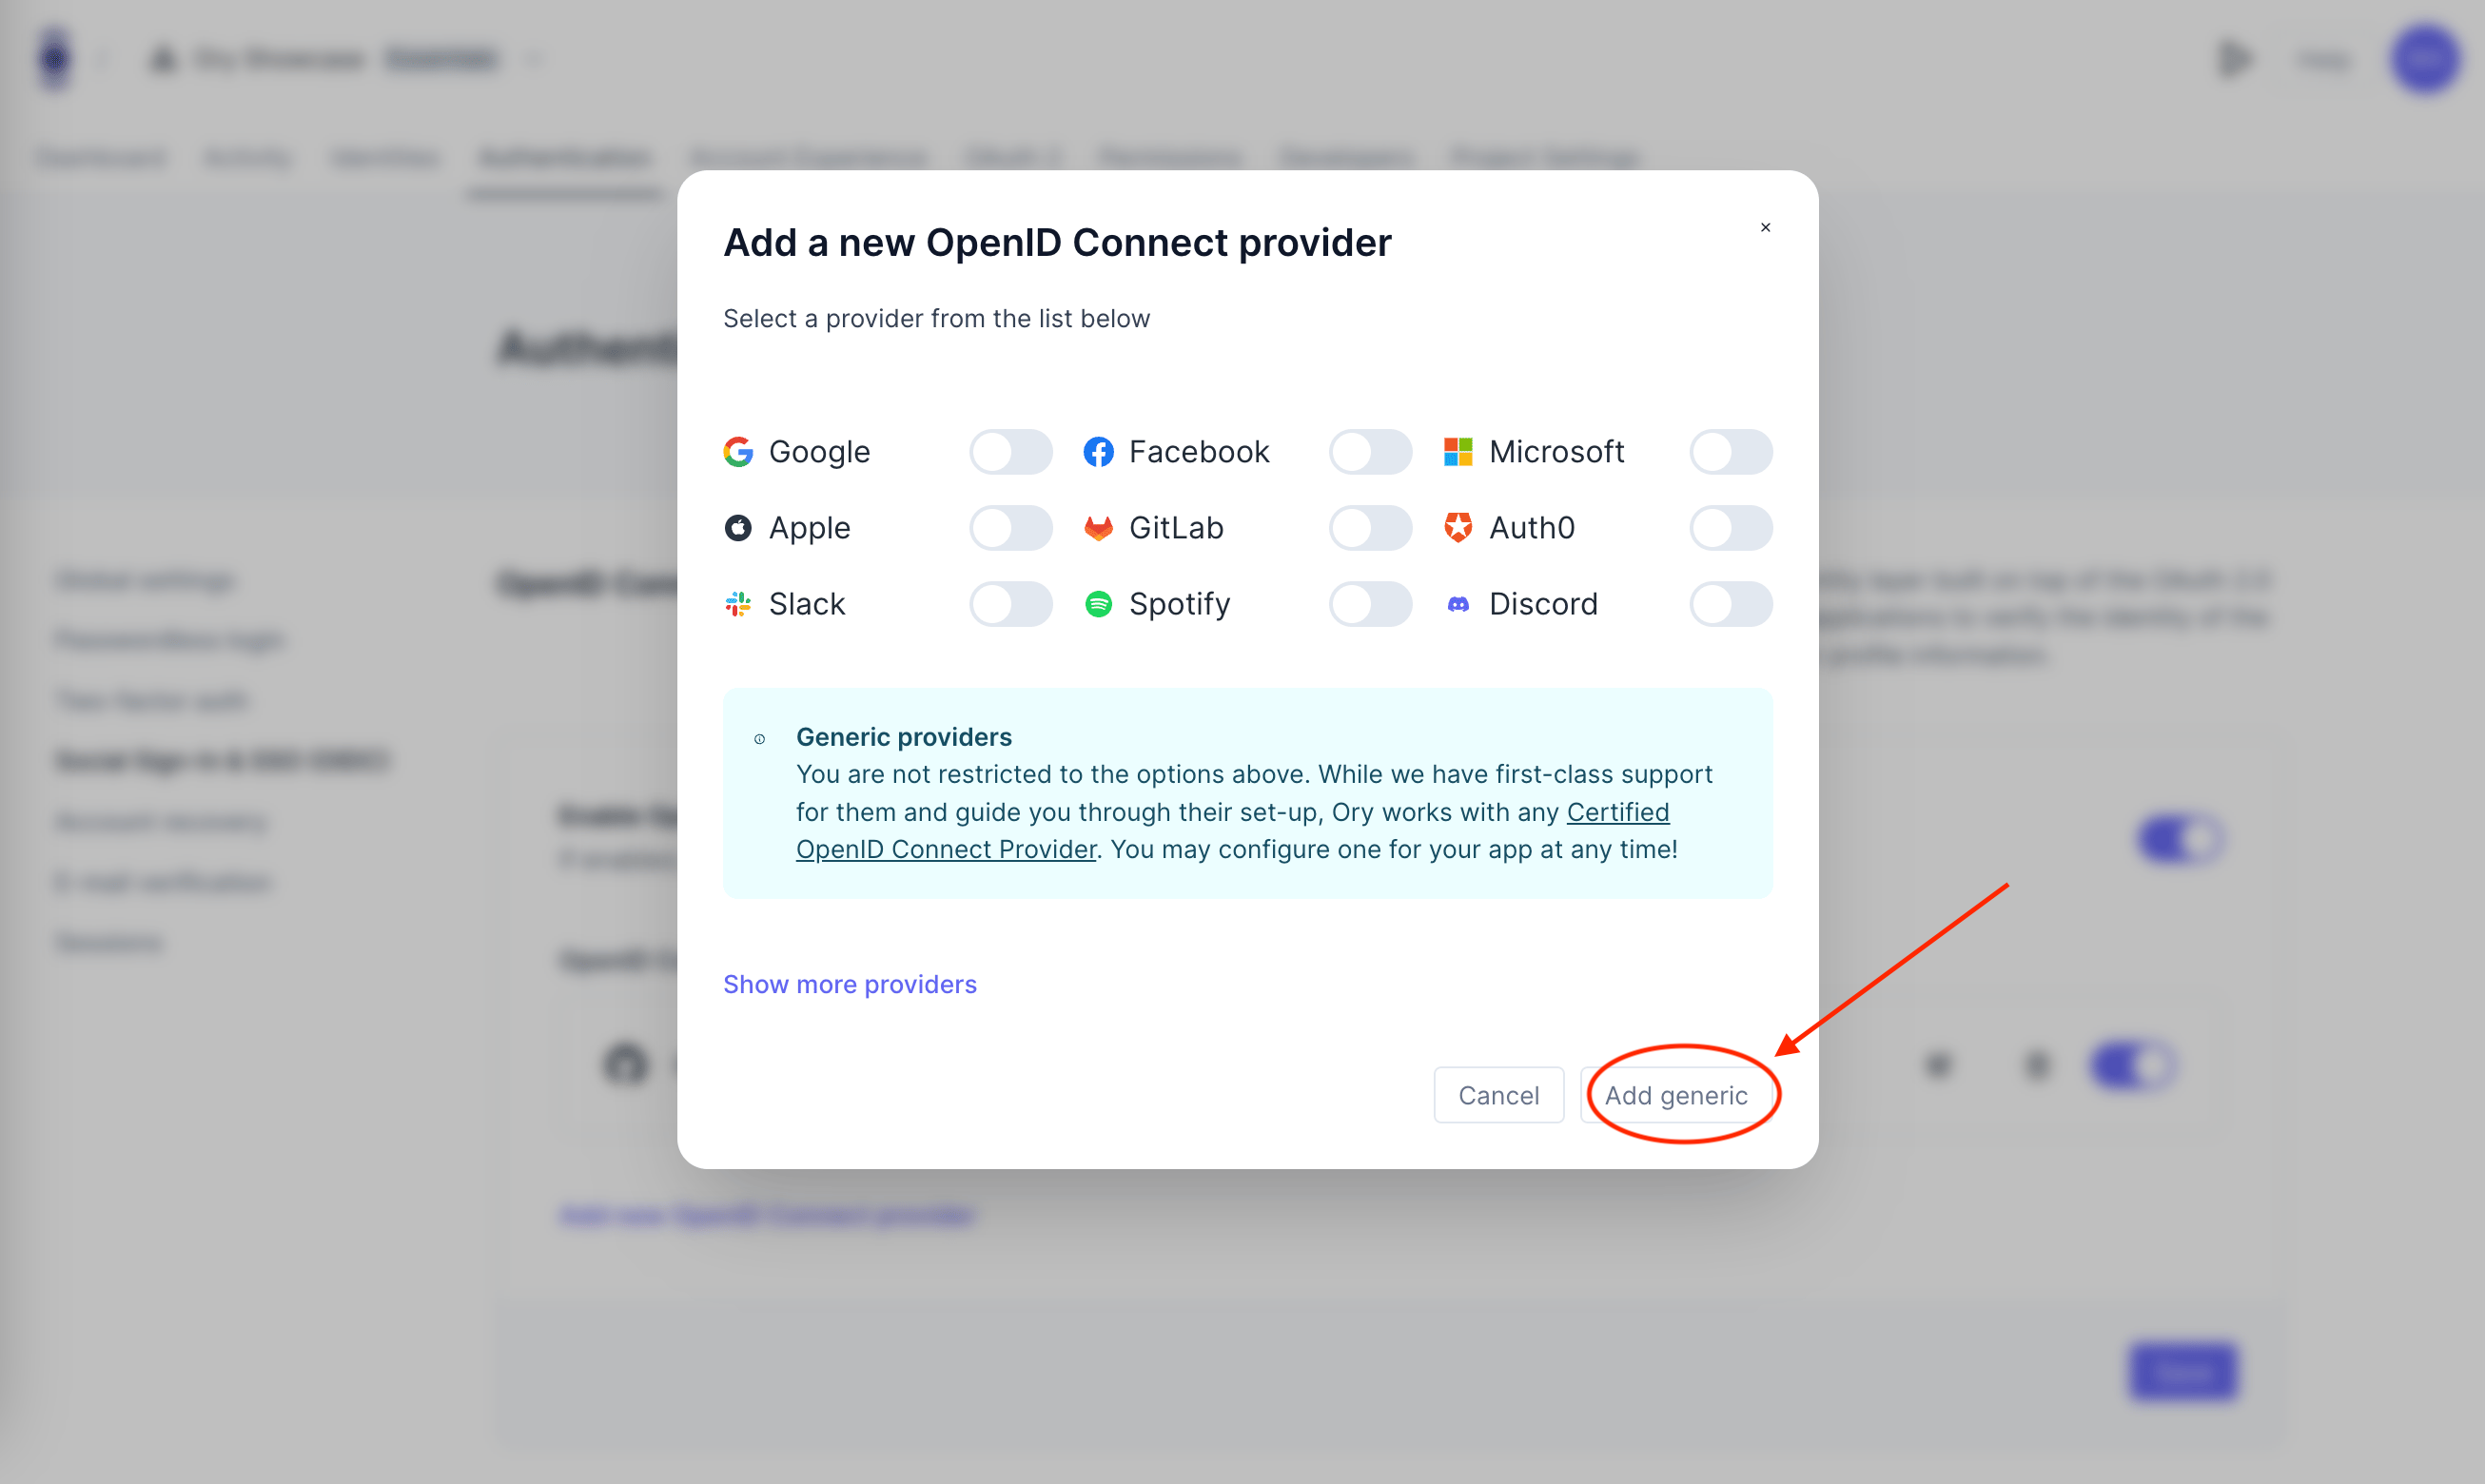
- Click on Add new OpenID Connect provider and choose Add Generic

You'll see a Redirect URI like this:
https://<your-project-slug>.projects.oryapis.com/self-service/methods/oidc/callback/H1o_k--i
Now copy this URL, paste it into the Redirect URI field in the OAuth2 UI, and hit Create Client at the bottom of the page. You don't need to change any other settings now, it works out of the box.
To create the OAuth2 client using the CLI, you can use the following command:
export project_id=your-project-id # replace with your project ID

ory create oauth2-client --project $project_id \
 --name "Your Corp" \
 --grant-type authorization_code,refresh_token \
 --response-type code \
 --scope openid,offline_access,email \
 --redirect-uri https://your-project-slug.projects.oryapis.com/self-service/methods/oidc/callback/H1o_k--i # replace with your redirect URI
Here's an example of the client details you'll see either in the Console UI or in your terminal:
CLIENT ID af2d1173-f1233-46a0-123fc-6b1825c06935b
CLIENT SECRET h7yN154hg3hIH20FEWQBFP-oYN8G.L
GRANT TYPES authorization_code, refresh_token
RESPONSE TYPES code
SCOPE openid offline_access email
AUDIENCE
REDIRECT URIS https://<your-project-slug>.projects.oryapis.com/self-service/methods/oidc/callback/H1o_k--i
You'll need to copy down the client ID and secret to configure the OIDC connection in the next step.
Create Ory Network project for Identities
Now, let's create a new Ory Network project for one of your applications or sub brands. This will project handles authentication flows, UIs, and methods for this app or brand at domain1.com. We'll call this project Identities - domain1.com. In this project, you will use Ory Identities as the identity provider (IdP) to manage user authentication and add the Login with Your Corp SSO option. Create it in the Ory Console or with the CLI:
ory create project --name "Identities - domain1.com"
Add the OpenID Connect Server
In the domain1.com project, add the OIDC connection to enable SSO authentication with the central OAuth2 project. In the step before we already navigated to the right section to add a new OIDC connection in the Identities - domain1.com project, so let's continue from there.
Choose a label for this OIDC connection, such as "Your Corp" - this is what the user will see on the button in the UI. Paste in your client ID and secret.
As Issuer URL you need to use the URL of the OAuth2 Server project, such as
https://your-project-slug.projects.oryapis.com. Then add the three scopes
openid, offline_access, and email.
As last step you can add a Jsonnet document that maps the OIDC claims to the Ory Identities schema. This is optional, but recommended to map the email address to the Ory Identities schema. You can use the following Jsonnet document:
local claims = std.extVar('claims');

{
  identity: {
    traits: {
      [if "email" in claims then "email" else null]: claims.email,
    },
  },
}
If you want to configure this through the CLI, export the Ory Identities configuration:
export project_id=your-project-id # replace with your project ID
ory get project $project_id --format json-pretty > project-config-$project_id.json
Edit the project-config-$project_id.json file to add the OIDC configuration.
To add the Jsonnet mapper you need to base64 encode it and add the result to the
mapper_url field. When self-hosting the Ory Kratos Identity Server, you can
also use a URL to point to a Jsonnet file.
Here's a snippet of how the configuration might look:
{
  "oidc": {
    "config": {
      "providers": [
        {
          "client_id": "93fdx55f-021e-fc50-86e2-c0a9cxc53cx91",
          "client_secret": "J~23XYm_k4xt123xh4_aQx0cV5f",
          "id": "t3-at56",
          "issuer_url": "https://your-project-slug.projects.oryapis.com",
          "label": "Your Corp",
          "mapper_url": "base64:// ...",
          "provider": "generic",
          "scope": ["offline_access", "openid", "email"]
        }
      ]
    },
    "enabled": true
  }
}
Thats it! You've set up a production-ready OAuth2 server to offer enterprise-grade SSO login for your organization.
Add your SSO to third-party applications
You can use the OAuth2 server to add Login with Your Corp SSO login to
third-party applications. This works with any application that supports OAuth2 /
OpenID Connect. You can use the OAuth2 client credentials from the previous step
to configure the connection.
Read the documentation of the third-party application to learn how to add the
Login with Your Corp OIDC connection.
For more information on how to configure Ory OAuth2, see the
OAuth2 Client documentation.
See it in action
Now that you've completed the setup, users on your domain1.com domain can use the Login with Your Corp option for SSO login. They will be redirected to the central OAuth2/OIDC server, where they can authenticate using their accounts, and upon successful authentication, they'll be redirected back to the domain1.com domain logged in.
To test it out navigate to the managed login UI of your domain1.com project.
You can find this in the Console UI or at this URL
https://your-project-slug.projects.oryapis.com/ui/welcome. Hit sign up and
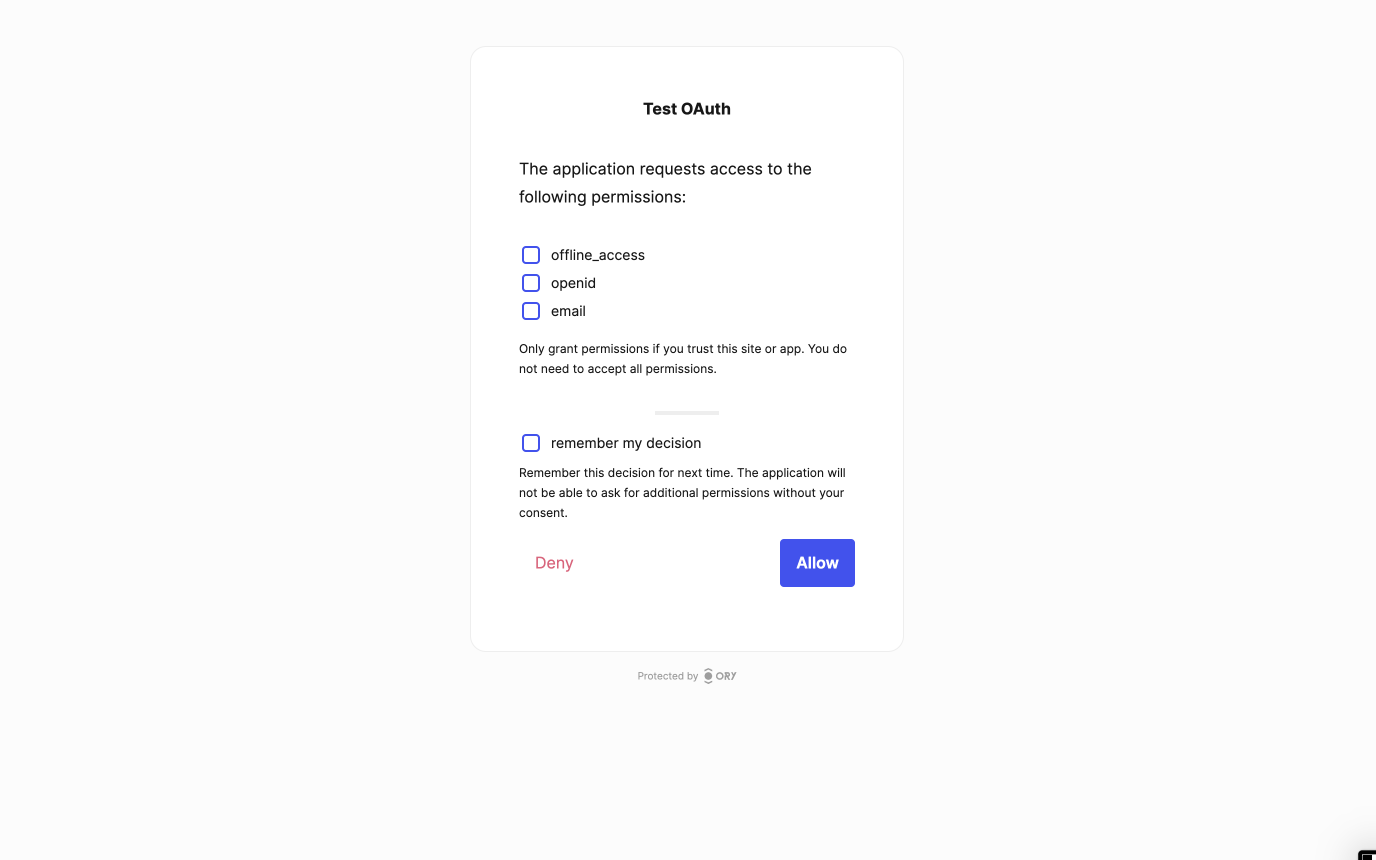
create a new account using "Sign up with Your Corp." You'll be redirected to the
consent screen of the OAuth2 server, where you can grant the "permissions" we
defined in the scopes earlier and allow the request.

After that, you'll be redirected back to the domain1.com UI and logged in. On the next login, you just need to hit the Login with Your Corp button and you will get a session. It's that simple for your users!
You did it
You've set up the Ory OAuth2 server to offer SSO login, providing your users with a secure, scalable, and user-centric authentication experience. By leveraging the Ory Network, you're benefiting from vetted security protocols and privacy-enhancing technologies, ensuring that user data remains protected at all times.
Join the community of developers operating on the Ory Network, and together, let's build a future reliant on digital identity with privacy and security at it's core.
Sign up today and create secure, scalable, and user-centric applications with peace of mind. Happy coding!
Next Steps
Further reading

The Perils of Caching Keys in IAM: A Security Nightmare

Caching authentication keys can jeopardize your IAM security, creating stale permissions, replay attacks, and race conditions. Learn best practices for secure, real-time access control.

Personal Data Storage with Ory Network

Learn how Ory solves data homing and data locality in a multi-region IAM network.